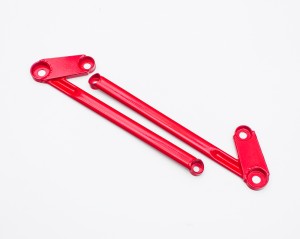
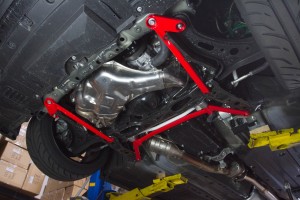
Install Guide: FRS, BRZ, GT86 Lower Chassis Braces
Agency Power 8pc Lower Braces:
These chassis braces are designed improve body rigidity and reduce chassis flex. Bolting each bar to the chassis reinforces the suspension structure preventing body flex which results in noticeably improved steering in high load driving situations. Traction during cornering is also improved by stiffening the chassis. Each component is made from lightweight Aluminum and is powder coated with a durable textured finish. Additional colors and custom power coating is available.
Features:
- 8pc Kit
- Supplied Hardware
- Powder Coated Finish
- Improve Body Rigidity
- Reduce Chassis Flex
- Improved Steering on High Load Driving
- Two Year Warranty
Fitment:
- Scion FRS, BRZ, Gt86 2013-2015
Tools Needed:
- Flat head screw driver
- 1/2 breaker bar or impact gun
- Socket wrench
- 12mm socket
- 15mm socket
- 17mm socket
- 19mm socket
- 17mm box end wrench
- Vise-grips
- Dremel
- Torque wrench
Recommendations:
- Installation to be performed by an aftermarket professional
- The use of a lift is highly recommended
Front Lower Link Bar (Left & Right):
Installation:
During the installation process it is important to only work on one side at a time. This will ensure that the engine, trans, and suspensions components are properly supported at all times.
- Start by removing the rear splash guard and skid plate using a flat head screw driver and 12mm socket
- Locate the 19mm bolt and nut that attach the core support to the front portion of the lower control arms.
- Starting on either the left or right of the vehicle loosen both the 19mm nut and bolt with the breaker bar or impact gun.
- Remove the factory brace as the new Agency Power Front Lower Link Bar (L or R) will replace this component
- Locate 15mm bolt supporting rear section of the front subframe.
*Note:There are 2 of these bolts and you will be removing the rear most bolt
- With your breaker bar or impact remove the 15mm bolt
- Place the new Agency Power Front Lower Link Bar (L or R) into place.
*Note: The bar has a 45 degree angle and should angle outward toward the wheel with the openings facing downwards
- Reinstall the factory hardware to its original position
- Tighten by hand to secure the Agency Power Lower Link bar (L or R)
- Before moving to the next side torque the bolts to the proper torque specifications
- 19mm bolt and nut are torqued to 100 ft/lbs
- 15mm bolt is torqued to 80 ft/lbs
- Once torqued to specifications, repeat the same process for the opposite side.
- Check torque on all 6 and you are ready to move on to the lower subframe brace
Front Lower Subframe Brace:
During the installation process of the Agency Power Front Lower Subframe Brace the steering rack will naturally drop about 2-3″.
- Locate the (2) 17mm steering rack bolts and (2) factory 15mm front bolts of the front lower subframe.
- With your breaker bar or impact remove both 17mm steering rack bolts and the front 2 bolt of the front lower subframe brace.
- Once both 17mm steering rack bolts have been removed, use your vise grips to secure the fixed washer.
- And using either the breaker bar or impact gun carefully unthread the washer from the bolt
- Once removed, place the factory washer between the Agency Power Front Lower Subframe Brace and the steering rack.
- Using (preferably) an impact gun or the breaker bar line up the steering rack, washer, brace and then hand tighten.
*Note: You will have to re-thread the bolt through the washer therefore the impact is highly recommended, but can be done with a breaker bar or socket wrench
- Torque steering rack bolts to 60 ft/lbs
- Re-install both 15mm factory bolts and torque to 50 ft/lbs
- Once all 4 bolts have been torqued properly you are ready to reinstall the factory skid plate
- Slide skid plate back into the front slots of front splash guard.
- Locate the 4 rear bolt holes
- Using the (4) longer supplied 8mm x 1.5 bolts and (4) aluminum spacers a fix the rear section of the skid plate.
- Place the spacer between the skid plate and frame of car and thread in the 8mm supplied bolts
- Once complete you will be able to re-attach the splash guards and other factory plastic trim
Rear Lower Chassis Link Bar (L & R):
- Choose either the right or left side of the vehicle
- Start by removing the rear LCA nut and bolt using both a 17mm box end wrench and 17mm socket
- Move the front of the rear subframe and loosed both the 19mm and 15mm bolt
- Unlike the front subframe bracket, this bracket while stay in its current place as the E-brake cables mount to it
- Insert the a supplied aluminum spacer between the bracket and Agency Power Lower Link Bar in the most front position, hand tighten with factory 15mm bolt
- Insert large aluminum spacer into the middle hole of the Agency Power Lower Link Bar
- Place Large washer between bracket and middle mount of Agency Power Lower Link bar, then hand tighten with factory 19mm bolt
- Replace LCA bolt with the supplied grade 8.8 bolt, the new bolt replaces the factory 17mm and steps up to a 19mm bolt (you will still use the factory 17mm nut)
- Then fasten the Agency Power Lower Link Bar with the new 19mm bolt using a box end wrench and 17 mm socket wrench
- Torque 15mm front brace bolt to 50 ft/lbs
- Torque the middle 19mm sub frame bolt to 80 ft/lbs
- Torque the new rear most 19mm bolt and 17mm nut to 70 ft/lbs
- Repeat process for the opposite side
- Double check torque on all bolts
- Now you are finished with install on all Agency Power Lower Chassis Braces
Rear Lower Body Brace:
- This brace replaces the factory bumper
- This is for off-road and track use only
- The factory rear bumper should be used at all times when on public roads for safety reasons
- Remove bumper cover
- Remove 4 bolt securing rear bumper
- Replace bumper with Agency Power Lower Body Brace
- Torque to 80 ft/lbs
- Reinstall rear bumper cover
Front and Rear Strut Bar:
Coming SOON!


